- A Mind for Numbers
- Accelerate
- Agile Project Management for Dummies
- Algorithms to Live By
- Atomic Habits
- AWS Certified Cloud Practitioner Study Guide
- Banking on It
- Brexitland
- Build Your Dream Network
- Bulletproof SSL and TLS
- Business Analysis
- Collapse
- CompTIA Security+ Practice Tests
- CompTIA Security+ Study Guide
- Corporate Rebels
- Countdown to Zero Day
- Creative Acts for Curious People
- Creative DIY Microcontroller Projects with TinyGo...
- Cryptanalysis
- Crypto Trader
- Cryptography
- Culture Code
- Daniel Goleman Omnibus
- Deep and deliberate delegation
- Dhl
- Drive
- Effective Python
- Every Tool's a Hammer
- Exam Ref AZ-900 Microsoft Azure Fundamentals
- Expert Scripting and Automation for SQL Server...
- Fifty Quick Ideas to Improve Your User Stories
- Fixing Your Scrum
- Fundamentals of ServiceNow Administration and...
- Future Leader
- Future of Violence - Robots and Germs, Hackers and...
- GCHQ Puzzle Book
- Getting Things Done
- Harvard Business Review manager's handbook
- Hooked
- How Google Works
- How to Take Smart Notes
- How to Win Friends and Influence People
- HTML and CSS
- I Think, Therefore I Am
- Itsm Value Streams : Transform Opportun
- JavaScript and jQuery
- Kill It with Fire
- Leaders Eat Last
- Leading change
- Leading Without Authority
- Lean Thinking
- LONDON'S UNDERGROUND.
- Managing Successful Projects Prince2
- Managing Successful Projects with PRINCE2
- Measure What Matters : OKRs
- Meteorology today
- Mindf*ck
- Modern Cryptanalysis
- Modernist cuisine at home
- Money Revolution
- Never Split the Difference
- New One Minute Manager
- Open Circuits
- Oversubscribed
- Permanent Record
- PHP 5 advanced
- Practical Docker with Python: Build, Release and...
- Practical electronics for inventors
- PRINCE2 for dummies
- Pro Python 3: Features and Tools for Professional...
- Pro SQL Server Always On Availability Groups
- Pro SQL Server on Linux: Including Container-Based...
- Professional Scrum Master Guide
- Project to Product
- Radical Simplicity
- Rules of People
- SAFe 5.0 Distilled
- Sapiens
- SEARCH INSIDE YOURSELF- TPB
- Secret Barrister
- Securing SQL Server: DBAs Defending the Database
- Site Reliability Engineering
- SQL Server 2017 Administration Inside Out
- Start with Why
- System Center Configuration Manager Current Branch...
- T-SQL Fundamentals
- Teach Yourself Electricity and Electronics,...
- Teach Yourself Setting Up a Small Business (Teach...
- Team Topologies
- The Art of Deception
- The art of invisibility
- The Chimp Paradox How Our Impulses And Emotions...
- The coaching habit
- The code book
- The Courage To Be Disliked
- The DevOps handbook
- The Epic Guide to Agile
- The Five Dysfunctions of a Team: A Leadership...
- The Go Programming Language
- The Golden Ratio
- The Introvert's Guide to the Workplace
- The Manager's Path
- The New Silk Roads: The Present and Future of the...
- The outward mindset
- The Phoenix Project
- The Professional Product Owner
- The Unicorn Project
- Turn The Ship Around!
- Visual Thinking
- Weapons of Math Destruction
- Who Moved My Cheese?
- Work Rules!
- Working Out Loud
- Writing An Interpreter In Go
- Wrong Fit, Right Fit
Send and Receive SMS Text Messages with Raspberry Pi and SIM800 GSM Board
The idea was a simple one. Connect up a GSM modem to a Raspberry Pi to send and receive SMS text messages. The ability to read SMS messages using serial AT commands is no longer possible with modern USB Mobile Broadband dongles, as some devices store their inbox beyond the reach of AT commands.
After several days of tinkering with a low cost Huawei E3531, I finally gave up. There may have been other alternative methods to access the SMS inbox, but all these felt more like a hack than a solution. Amazon are great for returns, so it went back and the search for a compatible device continued.
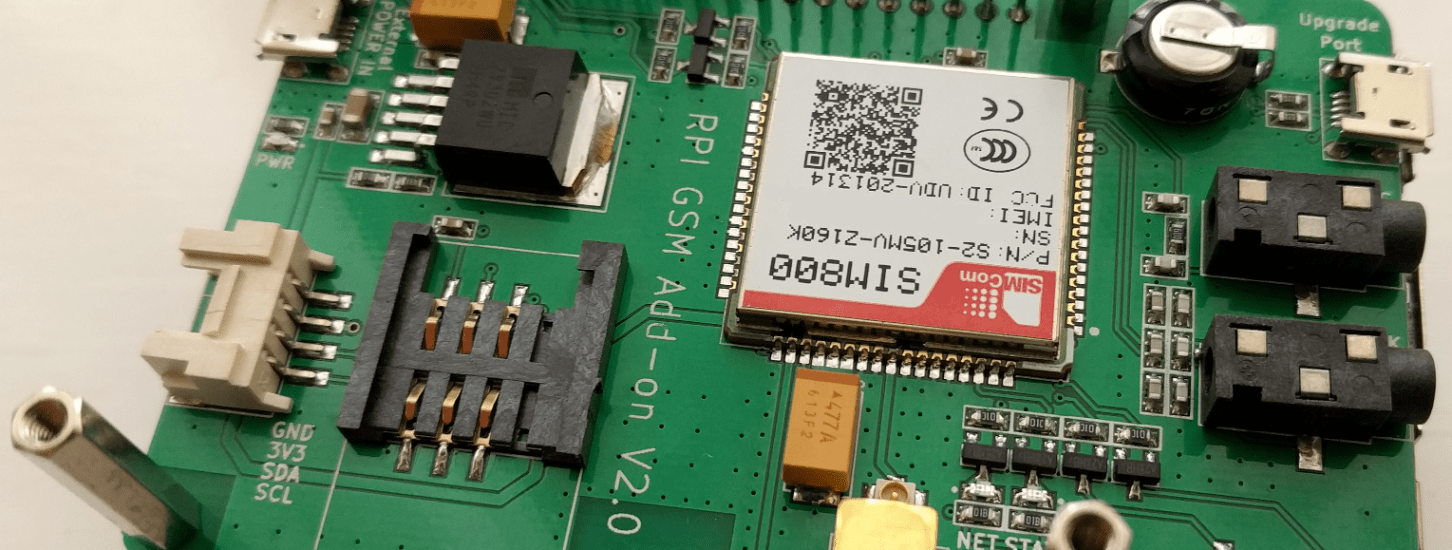
I stumbled upon an Itead Raspberry Pi GSM Board (SIM800) from ModMyPi. They have a nice purpose designed case for it as well. After reading some reviews, I purchased one, still a little concerned that the results may be similar to before.
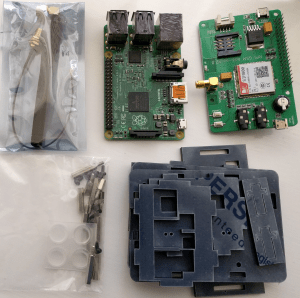
The SIM800 board and case arrived and I eagerly assembled it using a Raspberry Pi 2. The reviews mentioned some different steps for a Raspberry Pi 3, so if you are using one there may be some research required regarding the serial interface. I own around 25 Raspberry Pis, but only one of these is a Raspberry Pi 3, so the speed of a Raspberry Pi 2 is more than sufficient for this task.
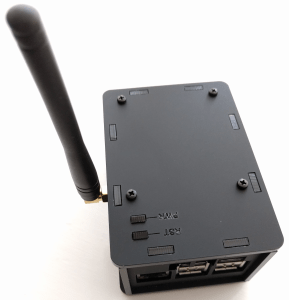
The finished case is smart and professional. I downloaded the latest Raspbian Stretch Lite image, using it to write the image a MicroSD card, before booting it up for the first time. I plugged in the additional power connector on the SIM800 board, to reduce the power load on the Raspberry Pi, and I am not short of enough USB cables or power supply ports anyway.
Once the Raspberry Pi has booted, I update the software, which is always a good first step.
sudo apt-get update
sudo apt-get dist-upgrade
I like to connect to the Raspberry Pi over SSH from an other computer, so I enable and start the SSH server. The IP Address of the Raspberry Pi can be found by typing sudo ifconfig.
sudo systemctl enable ssh
sudo systemctl start ssh
We need to complete some tasks in raspi-config, like changing the pi user password, hostname, and enable the serial interface.
sudo raspi-config
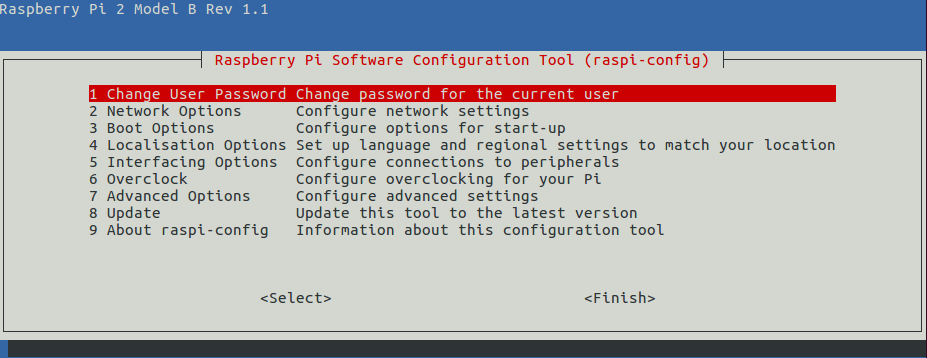
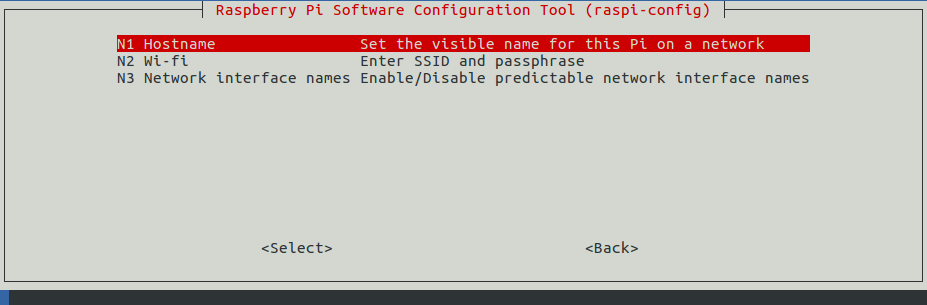
Using the menu system, the pi user password can be changed with option ‘1 Change User Password’. You’ll be prompted for a new password twice. It’s also good to change the hostname to something more meaningful, which can be achieved using option ‘2 Network Options’ and then option ‘N1 Hostname’. You’ll be prompted to enter a new hostname for your Raspberry Pi.
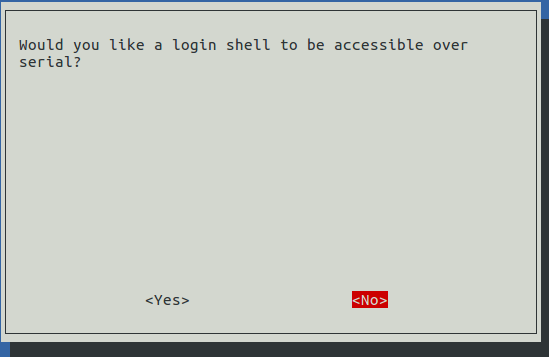
The serial interface will need to be enabled, using option ‘5 Interfacing Options’ from the raspi-config main menu, and then ‘P6 Serial’. We do not require the login shell to be accessible over serial. This would stop the operation of the SIM800 board, so select No.
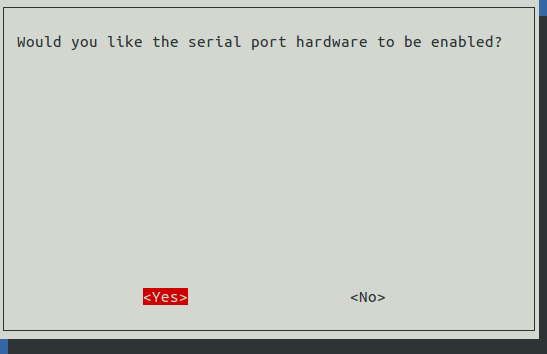
The serial port hardware will require enabling, so select Yes.
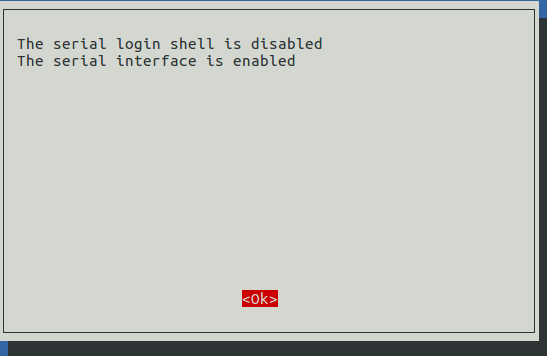
The settings will be confirmed to you. Double check and then press Enter.
Once back at the raspi-config main menu, press tab twice to highlight Finish, and press Enter. You’ll be asked whether to reboot, select Yes.
After the Raspberry Pi has rebooted, we’ll next install gammu for sending SMS text messages.
sudo apt-get install gammu
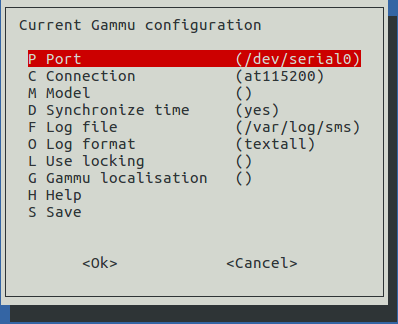
The settings will need to be changed using the gammu-config utility. These settings work for my Raspberry Pi, but they may differ on a Raspberry Pi 3, etc. Change the settings and the select option ‘S Save’.
sudo gammu-config
Let’s now test the configuration.You’ll need an activated and working SIM card in the SIM tray on the SIM800 board, with some credit in order to send an SMS text massage.
The SIM800 board may not be powered on at this stage, and may need the power button held for a second or two to power on. The easiest way to tell is to unscrew the top of the case and check the red power light is on.
Run the following command with your mobile telephone replacing the xxxxxxxxx in the international dialing format.
echo "Test message sent from my RPi" | sudo gammu --sendsms TEXT 00447xxxxxxxxx
The output should something like ‘Sending SMS 1/1….waiting for network answer..OK, message reference=x’ if successful, and an SMS text message should come through to your mobile phone.
If the SMS text message was received successfully, try replying to the SMS text message on your mobile phone. The following command should display all the unread SMS text messages received on the SIM800 board.
sudo gammu getallsms
If the SMS text message is displayed, everything is working as planned. If not, try waiting a little longer and try again.
At this point we have installed and configured the Raspberry Pi to send and receive SMS text messages.
If you’re interested in using MySQL to send and receive SMS text messages, read the follow-up post Using Gammu-smsd and MySQL to Send and Receive SMS Text Messages.